Just follow clear, expert-backed steps to master cat grooming at home tips for a stress-free grooming experience, so you can reduce anxiety and build trust with your cat. You’ll learn gentle brushing methods, how to trim fur and nails safely, and when to pause if your cat shows fear; watch for skin irritation, swelling or aggression to avoid injury, and use positive rewards to make grooming a calm, repeatable routine that improves your cat’s health and your bond.
Understanding Your Cat’s Grooming Needs
Importance of Grooming for Cats
Regular grooming prevents hairballs, reduces shedding by up to 50% during heavy-shed seasons, and helps you spot parasites or skin issues early; aim for at least a weekly session for short-haired cats and daily for long-haired breeds like Persians or Maine Coons. Use these cat grooming at home tips for a stress-free grooming experience to turn maintenance into bonding time and reduce vet visits for skin infections or mat-related wounds.
Common Grooming Challenges
Resistance, biting, and hiding are typical behaviors you’ll face; kittens often resist new tools, seniors may have arthritic joints that limit self-grooming, and overweight cats frequently develop mats around the belly. Flea infestations or allergies can make grooming painful, so watch for excessive scratching, scabs, or sudden coat loss and adjust your approach accordingly.
Specific strategies cut through most challenges: keep sessions to 2–5 minutes initially, use a non-slip surface and pheromone sprays to lower anxiety, and gradually introduce tools—finger comb, rubber brush, then slicker brush. For mats, never pull; apply detangler and work with blunt-tip scissors only if you’re trained, or book a professional trim. Seniors may need grooming aids like long-handled brushes or a raised grooming station to avoid stress and physical strain. Highlight any open sores or persistent hiding to your vet immediately.
Recognizing Your Cat’s Coat Type
Short-haired cats like Siamese shed minimally and usually need a weekly rub-down, whereas medium and long-haired breeds require daily brushing to prevent mats; double-coated breeds (e.g., Norwegian Forest Cats) shed heavily twice a year and benefit from deshedding tools. Identify your cat’s coat by stroking from head to tail—if an undercoat lifts easily, you’re dealing with a double coat.
Check hotspots where mats form first: behind the ears, under the armpits, at the tail base and belly. Long, silky coats tangle near collars and hindquarters, while dense undercoats trap dirt and moisture, raising the risk of skin infections. Adjust tool choice: rubber curry for short hair, slicker plus wide-tooth comb for medium hair, and de-shedding blades or undercoat rakes for double-coated cats to make your cat grooming at home tips effective and gentle.
Preparing for Grooming
Creating a Calm Environment
Choose a quiet, warm room with soft lighting and a non-slip surface like a towel on your lap or a mat; plug in a pheromone diffuser 15–30 minutes before starting and spend 10–15 minutes playing to burn excess energy. Limit sessions to 5–10 minutes and reward every 1–3 minutes with tiny treats so your cat links grooming to positive outcomes—this is one of the best cat grooming at home tips for a stress-free grooming experience.
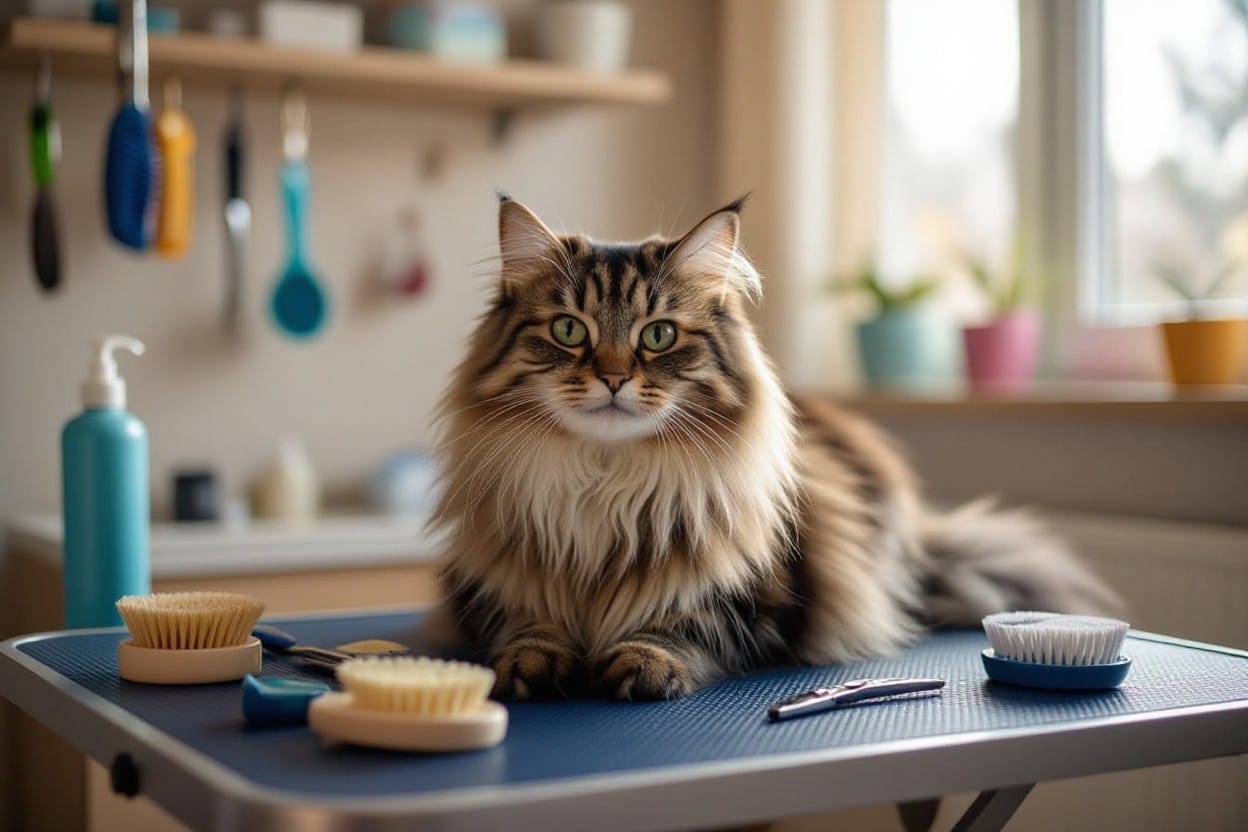
Essential Grooming Tools
Line up a slicker brush, wide-toothed comb, deshedding tool (use sparingly), rounded-tip scissors, quality nail clippers, soft toothbrush, cat-safe shampoo, towels, treats, and styptic powder for emergencies; choose stainless steel tools with rounded tips and keep everything within arm’s reach to avoid leaving your cat mid-session.
Match tools to coat type: short-haired cats generally need a slicker or rubber brush once weekly and a deshedding tool 1–2 times/month, while long-haired breeds benefit from daily combing and weekly deep brushing to prevent mats. Use the deshedding tool with no more than 4–6 gentle strokes per area to avoid skin irritation, clean hair from brushes after each use, and replace worn blades or pads—a dull tool pulls and increases stress.
Safety Precautions
Keep a small first-aid kit (styptic powder, antiseptic wipes, gauze), avoid using human shampoos, never force your cat, and stop if you see hissing, flattened ears, or repeated attempts to escape; limit attempts to two short sessions a day to prevent escalation and injury.
Trim nails by pressing the pad to expose the tip and cutting only the white edge—about 2–3 mm per clip; with black nails, take tiny slivers and look for a chalky center. If bleeding occurs, apply styptic powder or cornstarch and hold pressure for 2–3 minutes. Do not cut mats close to the skin—if mats cover >30% of the coat or sit flush to skin, seek a professional groomer or vet, and never attempt chemical sedation yourself; sedation must only be administered by a veterinarian.
Grooming Tools Overview
Brushes and Combs for Different Coat Types
Use a slicker brush for long or matted coats, a bristle brush for short-haired shine, and a deshedding tool for double-coated breeds to cut shedding by up to 50% during heavy seasons; wide-tooth combs work through tangles and metal combs check for mats and fleas. Match tool to coat: short-haired cats need gentle bristles while long-haired cats benefit from a pin-and-slicker combo. Recognizing which brush prevents skin irritation and reduces loose hair makes grooming faster and less stressful for both of you.
cat grooming at home tips for a stress-free grooming experience
cat grooming at home tips
how to groom a cat at home without stress for your feline friend
Tool
Best For
Slicker brush
Long coats, removing mats
Bristle brush
Short coats, distributing natural oils
Deshedding tool
Double-coated breeds, seasonal shedding
Wide-tooth comb
Untangling and finishing
Metal comb
Finding mats and checking skin/fleas
Nail Trimmers and Clippers
Choose between scissor-style, guillotine, or a rotary grinder based on your comfort and your cat’s tolerance; many cats need trims every 2–4 weeks and older cats often have longer quick. Trim small amounts at a time and stop if you see pink inside the nail to avoid bleeding.
Practice handling paws daily so you can hold the toe gently, press the pad to extend the claw, and cut the tip at a 45° angle; keep styptic powder on hand for accidental nicks and use a grinder to smooth edges if your cat resists clippers. Trim in short sessions and reward with a soft treat to reinforce calm behavior.
Cleaning Supplies and Accessories
Stock pet-safe shampoo, saline ear cleaner, enzymatic stain wipes, microfiber towels, and a lint roller; use ear cleaner drops sparingly and never insert cotton swabs into the canal. Opt for unscented, hypoallergenic formulas and separate grooming towels to avoid cross-contamination.
Carry disinfectant (70% isopropyl) for metal tools and rinse thoroughly after cleaning, air-dry completely, and store in a dry case; use saline eye wipes for discharge and enzymatic sprays for urine/feces stains. Replace disposable wipes monthly and inspect supplies every 6 months for wear to keep grooming hygienic and safe.
The Grooming Process: Step-by-Step
Step-by-step checklist for cat grooming at home tips for a stress-free grooming experience
Step
Action, tools & timing
1. Set the scene
Pick a warm, quiet room with a non-slip towel. Limit sessions to 5–15 minutes. Have treats, a towel, and all tools within arm’s reach to keep stress low.
2. Brushing
Use a slicker brush for long hair, a pin brush for medium coats, and a rubber grooming glove or deshedder for short coats. Brush frequency: long daily, medium 3×/week, short weekly.
3. Nail trim
Use cat clippers and styptic powder. Trim every 2–3 weeks, cutting only the tip to avoid the quick; for clear nails the quick is visible as pink, for dark nails trim tiny amounts at a time.
4. Ear check & clean
Inspect for wax, odor, or redness. Clean with a vet-approved solution on a cotton ball; never insert cotton swabs into the canal. Clean every 2–4 weeks if waxy.
5. Bath (if needed)
Bathe only if greasy, flea-infested, or medicated; use cat shampoo and lukewarm water at about 37°C (98–100°F). Rinse thoroughly and towel-dry.
6. Final check & reward
Comb through, inspect skin and coat, offer a small treat and quiet praise. Record any persistent issues and consult your vet if needed.
Brushing Techniques by Coat Type
For long-haired cats use a slicker brush daily and a wide-tooth comb to gently work out tangles 1–2 cm at a time; medium coats respond well to a pin brush 3–4 times weekly; short-haired cats benefit from a rubber glove or deshedder once weekly to capture loose undercoat and reduce shedding by up to 50% during heavy-shed seasons.
Start by handling paws daily so your cat tolerates touch; press the toe to extend the nail, then clip the sharp tip at a 45° angle, leaving the pink quick intact. Aim for trims every 2–3 weeks, use styptic powder for any bleeds, and offer a treat after each successful nail.
Work one paw at a time and limit attempts to a few nails per session if your cat resists. For dark nails, take tiny clips—1–2 mm—and inspect the cut surface; stop if you see a dark central dot (the quick). If you accidentally cut the quick, apply styptic powder or cornstarch and hold gentle pressure for 1–2 minutes; seek veterinary care only if bleeding persists beyond 10 minutes or if your cat shows severe distress.
Ear Cleaning: A Safe Approach
Inspect ears for wax, redness, or foul odor; apply a vet-approved cleaner to a cotton ball and wipe the outer ear only, avoiding insertion beyond the visible canal. Clean every 2–4 weeks for wax-prone cats and stop if you detect pain, heavy discharge, or blood—those signs warrant veterinary evaluation.
Gently lift the ear flap, look for dark crumbly debris (ear mites) versus brown wax; for cleaning, place 2–3 drops of solution into the ear, massage the base for about 20–30 seconds, then let your cat shake and use a cotton ball to wipe away loosened wax. Avoid cotton swabs and never force the ear canal open—consult your vet if you see inflammation, a black discharge, or your cat resists strongly.
Bathing Your Cat: Best Practices
Only bathe for grease, fleas, strong odor, or prescribed medicated treatment; wet your cat quickly with lukewarm water (~37°C), lather with a cat-formulated shampoo, rinse thoroughly to remove all residue, and towel-dry. Expect sessions to take 10–20 minutes—use rewards and calm tones to reduce stress.
Prep by brushing out tangles and trimming nails first. Place a non-slip mat in the sink or tub, keep water to chest level, and avoid pouring water over the head—use a cup or damp cloth. Rinse until water runs clear (soap residue causes itchiness), then wrap your cat in a warm towel and use a low-heat blow dryer only if tolerated. If your cat shows extreme stress or hypothermia signs (shivering, cold extremities), stop and consult a pro groomer or vet; for minor dirt consider rinseless shampoos as a gentler alternative.
Managing Cat Anxiety During Grooming
Understanding Feline Body Language
Watch for slow-blinking, relaxed ears and a wrapped tail as signs your cat is comfortable; flattened ears, hissing, dilated pupils, swatting or sudden biting mean stop immediately. Subtle cues like repeated lip-licking, yawning, or tail-flicking often precede escalation, so pause grooming at the first sign. Use these signals to pace sessions and apply the cat grooming at home tips for a stress-free grooming experience you’ve been building.
Desensitization Techniques for Nervous Cats
Begin with 3–5 minute sessions daily: keep the brush in the same room, reward calm behavior, and touch paws or collar for 2–3 seconds before releasing. Gradually increase handling duration by about 10–20% each session; many cats show measurable improvement within 2–6 weeks. Pair steps with a pheromone diffuser and quiet space to speed progress on how to groom a cat at home without stress for your feline friend.
Use a four-step protocol: (1) leave grooming tools visible, (2) reward approach to tools, (3) touch target areas for 2–5 seconds, (4) add brushing for 5–15 seconds. Repeat each step for 3–7 days until your cat stays relaxed; if you see hissing or swatting, revert one step and shorten sessions. Track progress with short notes—daily wins compound into consistent calm.
Positive Reinforcement Methods
Offer high-value treats (freeze-dried chicken, tuna bits) immediately after desired behavior, using a clicker or consistent marker word to bridge action and reward. Start with continuous rewards, then shift to an intermittent schedule once your cat tolerates 5–10 grooming minutes. Integrate these cat grooming at home tips into every short session to build positive associations quickly.
Shape behavior by rewarding successive approximations: first for allowing touch, then for longer holds, then for brief brushing. Aim for 8–12 positive interactions per day outside formal grooming, and use toys for cats less food-motivated. Avoid any punishment; positive methods reduce stress and create reliable cooperative behavior over 2–8 weeks.
Dealing with Mats and Tangles
Identifying and Resolving Mats
Check behind the ears, under the armpits and at the base of the tail for felted clumps that resist gentle parting; small surface mats often untangle with your fingers and a wide-tooth comb, while dense mats require a dematting rake or mat splitter. If a mat is larger than 2 inches or lies within ¼ inch of the skin, stop and seek professional help to avoid skin tears or infection.
Preventive Measures to Avoid Tangles
For long-haired breeds such as Persians and Maine Coons, brush daily for 5–10 minutes; medium coats benefit from 3 sessions weekly, short-haired cats need weekly maintenance. Trim hair around collars, rear end and underarms, use a leave-in conditioner spray after baths, and adopt these cat grooming at home tips for a stress-free grooming experience to keep mats from forming.
Schedule brushing to match seasonal shedding peaks—daily during heavy molt periods—and use the “lift-and-comb” method: hold skin taut, lift fur at the base and comb from tips to roots in short strokes. Reward your cat with a treat after 3–5 minutes to build positive association, and mark grooming days on a calendar so you don’t skip sessions during busy weeks.
Tools for Dematting Safely
Keep a slicker brush, wide-tooth comb, stainless-steel finisher comb, dematting rake and a mat splitter on hand; a small clipper with guard useful for shaving stubborn mats. Avoid blunt force pulling and never use ordinary scissors near the skin—scissors can cause severe cuts—and always work slowly, checking your cat’s comfort every minute.
Use the mat splitter for dense, felted sections and a rake to remove undercoat tangles, then finish with a fine-tooth comb to confirm no hidden knots remain. Apply a pet-safe detangling spray to lubricate fibers, hold the mat at the base to protect skin, and if the mat is bonded to skin or causes redness, opt for clippers or professional grooming instead of forcing removal.
Seasonal Grooming Considerations
Grooming in Hot Weather
Limit sessions to 5–10 minutes and groom in the coolest part of the day to reduce stress; a cat’s normal temperature is 100.5–102.5°F, and signs like excessive panting, drooling or lethargy can indicate heatstroke. Offer cool water, use damp microfiber cloths to wipe the belly, and avoid full shaving unless a vet advises it. Keep tools out of direct sun and check that your cat can retreat to shade during grooming.
Preparing for Shedding Season
Expect heavy shedding in spring and fall and brush daily for 5–10 minutes to remove loose undercoat before it becomes matted; use a slicker brush plus a metal comb for tangles and a deshedding tool once a week. Regular short sessions reduce hairballs and coat clumps, and bathing with cool water can help loosen dead hair when timed with brushing.
Plan a simple routine: schedule 5–10 minute brushings each evening, rotate tools (slicker for surface, deshedding tool for undercoat), and check for mats behind the ears and under the armpits where 70–90% of problem tangles form. Offer a small treat after each session to reinforce calm behavior and consult your vet about dietary adjustments or supplements if shedding suddenly increases.
Winter Grooming Tips
Trim excess fur between paw pads, wipe paws after outdoor exposure to remove salt and ice, and apply a vet-recommended paw balm to prevent cracking. Increase indoor humidity to help dry skin, brush weekly to distribute natural oils, and avoid frequent baths—cold, wet fur raises the risk of hypothermia. Monitor for weight loss or shivering as signs of cold stress.
cat grooming at home tips for a stress-free grooming experience — keep sessions short and warm, focusing on paws and thicker coat areas.
cat grooming at home tips — use a humidifier and moisturizing products to combat winter dryness.
Any how to groom a cat at home without stress for your feline friend — maintain a calm routine with treats and a warm resting spot after grooming.
Address specific winter problems: trim nails to prevent snow and ice from clumping, check tucked areas like the groin for frostbite risk, and reduce bath frequency to once every 8–12 weeks unless medically required. Run a humidifier to keep indoor relative humidity around 30–50% to prevent flaky skin, and weigh your cat monthly—loss of 5% body weight in a month warrants a vet visit. Apply gentle, vet-approved moisturizers for persistent dryness.
cat grooming at home tips for a stress-free grooming experience — prioritize warmth, short duration, and gentle handling during winter sessions.
cat grooming at home tips — check paws, use balms, and maintain indoor humidity to protect skin and coat.
Any how to groom a cat at home without stress for your feline friend — offer consistent routines and cozy rewards to keep winter grooming positive.
Grooming for Specialized Breeds
Grooming Long-Haired Breeds
Daily brushing for 5–10 minutes keeps coats of Persians, Maine Coons, and Ragdolls manageable; start with a slicker brush to remove loose topcoat, follow with a wide-tooth comb through the armpits, belly and behind the ears where mats form and can trap moisture. Use dematting tools only on severe tangles and never pull; schedule a full grooming session every 4–8 weeks and bathe or wipe down every 6–8 weeks to reduce oil buildup and help with cat grooming at home tips for a stress-free grooming experience.
Grooming Short-Haired Breeds
Short-haired cats like American Shorthairs and Siamese benefit from weekly grooming with a rubber mitt or bristle brush for 5–15 minutes, increasing to 2–3 times weekly during spring/fall shedding. Check skin for fleas and dry patches while you groom, trim nails every 2–4 weeks, and limit baths to every 8–12 weeks unless oily or dirty to prevent dry skin.
During heavy-shedding periods, use a de-shedding tool (e.g., Furminator-type) every 2–4 weeks for 5–10 minutes to remove undercoat hair and cut loose-hair ingestion; combine grooming with short positive treats so your cat associates the session with calm. Avoid aggressive over-brushing near the spine and belly to prevent skin irritation, and never use human shampoos—opt for cat-formulated products and consult your vet for persistent dandruff or lesions.
Unique Grooming Needs for Hairless Cats
Sphynx and Peterbald cats need baths about every 7–14 days to remove oily residue, plus weekly ear cleaning and regular facial wipe-downs; apply a thin layer of vet-approved moisturizer only if skin is dry, and protect exposed skin from sun with a pet-safe sunscreen or covered clothing during outdoor time to avoid sunburn.
Give hairless cats warm, short baths (5–10 minutes) using gentle, cat-specific cleansers to prevent follicular blockages and acne; towel-dry thoroughly and keep your home comfortably warm (around 20–24°C) so your cat doesn’t shiver. Monitor skin folds and nipple areas for redness or pustules—if you see swelling, discharge, or persistent oiliness, contact your vet promptly to rule out infection or allergy and follow product recommendations to avoid harsh chemicals.
Post-Grooming Care
Reward Systems for Positive Experiences
Pair grooming with a high-value reward—a tiny piece of freeze-dried chicken or a 15–30 second play burst—immediately after sessions to build a positive association. Use a clicker or a consistent phrase and give the reward within 2–3 seconds so your cat links the action to the experience; over a month this can transform anxious responses into relaxed behavior and support your broader cat grooming at home tips for a stress-free grooming experience.
Maintaining a Regular Grooming Schedule
Set clear intervals: brush short-haired cats about once weekly, brush long-haired cats 3–5 times per week, and schedule nail trims every 2–4 weeks. Keep sessions to 5–10 minutes to avoid stress, mark recurring appointments in your calendar or phone, and adjust frequency during heavy-shedding seasons like spring.
Track results for 4–8 weeks to see tangible benefits: consistent brushing can reduce loose hair and hairballs, with many owners reporting up to a 40–50% drop in visible shedding when routines are maintained. Modify tools and timing for kittens (very short, 1–3 minute introductions) and seniors (softer brushes, shorter sessions). Use a dematting comb only on manageable tangles; for mats larger than a quarter you should consult a professional to avoid skin tears or stress-induced aggression.
Observing Your Cat’s Behavior After Grooming
Watch for immediate reactions: relaxed rolling, purring, or resumed self-grooming indicate comfort; hiding, hissing, excessive licking, limping, or fluttering of the skin may signal pain or irritation. If you spot bleeding, open wounds, or limping, pause further handling and inspect the area carefully.
Perform a focused 5–10 minute check: part the fur to scan for nicks, swelling, or hot spots and feel for residual mats. If bleeding continues beyond several minutes despite gentle pressure, or if your cat becomes lethargic, refuses food for 24 hours, or shows repeated pain signs, contact your veterinarian promptly. Use rewards and calm tones afterward to rebuild trust and reinforce the positive aspects of your cat grooming at home tips.
Grooming Troubleshooting
Common Issues and Solutions
Excess shedding, mats, ear wax, and flea dirt are the problems you’ll see most often. Brush short-haired cats 2–3 times weekly and long-haired cats daily to prevent mats; mats within 1–2 mm of the skin risk dermatitis and should be handled by a pro or with a dematting tool while you hold the base of the hair to protect skin. For fleas use a vet-approved topical; for hard-to-reach ear wax, use a soft cotton ball and vet guidance. These are core cat grooming at home tips for a stress-free grooming experience.
Handling Aggressive Behavior
Sudden lunges, flattened ears, and hissing mean stop and regroup—use a towel wrap (burrito) for 30–60 seconds to control a session safely, pair each step with high-value treats, and limit handling to 5–10 minute sessions. If you face repeated biting, avoid forcing grooming; you increase the chance of bites and stress-related avoidance.
Desensitization over 7–14 days often works: leave the brush near your cat for several days, reward calm investigation, then touch with the brush for 3–5 seconds before rewarding. Use a second person to gently hold the cat, thick gloves if needed, and consider a nylon grooming bag for anxious cats; never attempt chemical sedation without veterinary supervision. Track progress—if the cat tolerates increased duration by 10–20% every few sessions, you’re on the right path.
When to Seek Professional Help
Deep mats, skin bleeding, persistent aggression, visible infection, or signs of pain during handling are signals you should stop and consult a professional. If your cat exhibits continuous struggling beyond several short sessions or shows lethargy, fever, or open sores, contact a groomer with veterinary collaboration or your vet right away; bleeding and infection require immediate attention.
Professional groomers can safely clip severe mats with specialized clippers; vets can sedate if pain or medical issues prevent safe handling. Expect assessment to include a skin check and possibly analgesia or antibiotics if infection is present. Costs vary by complexity and may increase when sedation or veterinary care is needed; prioritize safety over savings—properly treated mats and infections prevent chronic pain and costly complications. Use referrals from your vet for reputable groomers experienced in handling fractious cats.
The Importance of Regular Grooming
Health Benefits for Your Cat
Regular brushing prevents painful mats that can hide infections, reduces shedding and hairballs, and helps you spot lumps, fleas, or skin irritation early. Aim for 2–3 sessions weekly for long-haired cats and once weekly for short-haired, check ears and eyes during each session, and trim nails every 3–4 weeks. These cat grooming at home tips for a stress-free grooming experience cut down on vet visits by catching issues before they escalate.
Enhancing the Bond with Your Cat
Grooming becomes trust-building when you read body language—slow blinks and relaxed ears mean you can continue, flattened ears or a twitching tail mean stop. Use short, 5–10 minute sessions tied to treats or play so your cat links grooming to positive outcomes, and always let your cat set the pace to strengthen attachment during each session.
Start with predictable routines: after a play session or meal, offer a 2–5 minute brushing using a soft brush and a calm voice, then reward with a small treat. Track progress—if your cat tolerates longer sessions, slowly increase to 10–15 minutes. Case studies from experienced groomers show gradual, consistent sessions reduce resistance in 70–80% of anxious cats; pay attention to micro-signals and stop before your cat escalates to swatting or biting.
Cost-Effective Grooming at Home
Handling basics yourself saves money versus professional grooming—many salons charge $50–$120 per session. Invest once in quality tools (slicker brush, de-shedding tool, nail clippers) and you’ll cut recurring costs while keeping your cat comfortable more often. These cat grooming at home tips help you avoid unnecessary salon trips and maintain your cat’s coat between appointments.
Essential starter kit: a slicker brush ($10–20), de-shedding tool ($20–35), guillotine or scissor clippers ($7–25), and styptic powder for nail nicks. Replace dull blades and worn brushes yearly. When trimming nails, avoid cutting the quick—clip small amounts across several sessions if needed. For occasional baths, use cat-formulated shampoo and dry quickly to prevent chilling; routine home care reduces salon frequency and saves you both stress and money.
Frequently Asked Questions
How Often Should I Groom My Cat?
Short-haired cats typically need brushing about once a week, while long-haired breeds like Persians require brushing daily or every other day to prevent mats; trim nails every 2–3 weeks and bathe only when dirty or every 1–3 months for skin issues. Senior or overweight cats often need more frequent help with brushing and mat prevention. Follow these specific timings as part of your cat grooming at home tips for a stress-free grooming experience.
What to Do If My Cat Won’t Allow Grooming?
Begin with 3–5 minute sessions, offering high-value treats and calm praise; touch paws, belly and the brush for a few seconds before using it. Use a towel wrap for brief nail trims, a non-slip mat, and try a pheromone spray like Feliway to lower anxiety. Stop before your cat escalates to hissing or biting and return later to build trust with short, consistent steps.
Use a stepwise plan over 1–2 weeks: day 1–3 focus on handling and treats, day 4–7 introduce the brush for 30–60 seconds, then gradually increase. Clicker training or feeding right after sessions creates a clear positive association. If your cat shows repeated aggressive behavior or extreme fear, consult a vet or certified behaviorist rather than forcing grooming.
Are There Any Risks in Grooming at Home?
Common hazards include nail quicking, skin nicks from scissors or clippers, mat-related skin tears, and stress-induced biting; over-bathing can strip natural oils and cause dry skin. Using dull tools or improper mat removal increases the chance of bleeding or infection. Keep styptic powder on hand and stop immediately if your cat becomes highly stressed or injured.
Prevent problems by using the right tools: rounded-tip scissors, a quality slicker brush, and a low-speed clipper with cooled blades (check blades every 2–3 minutes). For severe mats or if bleeding occurs, seek a professional groomer or veterinarian—attempting to cut dense mats yourself can cause painful skin damage and worsen behavioral avoidance. Sanitize tools between animals with 70% isopropyl alcohol to reduce infection risk.
Expert Tips for Stress-Free Grooming
Begin with cat grooming at home tips for a stress-free grooming experience: 5–10 minute sessions, 3–5 times per week to build tolerance.
Use a quiet, low-vibration clipper and check for hot blades every 30 seconds to avoid burns.
Reward with high-value treats and short play breaks; pair tools with treats using cat grooming at home tips.
Deshed with a slicker or de-shedding tool on long-haired cats to prevent mats that cause skin irritation.
Consider gradual conditioning: towel wraps, pheromone sprays, and clicker steps recommended in how to groom a cat at home without stress for your feline friend.
Insights from Professional Groomers
Many groomers advise you to break sessions into micro-steps: 2 minutes of brushing, 1 minute of touch, then a reward; this method often reduces resistance within 2–3 sessions. Use a low-noise dryer or towel-dry by hand to avoid startling a cat sensitive to sound, and always test clippers on your wrist for heat before use on skin.
Personal Experiences from Cat Owners
Owners routinely report success by pairing grooming with predictable routines: same room, same mat, same 5-minute pattern; one owner cut grooming time from 20 to 6 minutes by using a grooming mitten and timed treats. Keep a calm, steady voice and stop before your cat shows clear signs of distress.
Multiple owners note that older cats respond better to seated grooming on your lap with an elevated towel and non-slip mat; for anxious younger cats, try short daily handling drills—5–7 gentle seconds per paw—combined with clicker rewards. Use a soft rubber brush for week 1, move to a slicker in week 2, and record progress to adjust frequency; mark skin redness or persistent flinching as signs to pause and consult a vet or pro groomer.
Innovative Grooming Techniques
Treat-dispensing brushes, waterless foams, and clicker-trained desensitization are gaining traction; try a 7-day mini-plan where you add one novel tool per day and track tolerance, avoiding anything that causes heavy panting or hiding. Integrate the phrase cat grooming at home tips into cues so your cat learns the sequence.
Advanced methods include using a soft muzzle for very reactive cats during short clipping sessions (limit to under 2 minutes), or a timed feeder that dispenses food during brushing to create positive association. When using electric tools, rotate 10 seconds on, 20 seconds off to prevent overheating; mark any repeated skin snagging or vocalizations as danger signals that warrant stopping immediately.
Knowing which combination of pro advice, owner-tested routines and innovative tools fits your cat will let you groom with greater confidence and less stress.
Final Words
Summing up, you can master cat grooming at home tips for a stress-free grooming experience by pacing sessions, using positive reinforcement, gentle tools, and consistent routines tailored to your cat’s needs; following this guide helps you reduce anxiety, maintain coat and health, and build trust so grooming becomes an easy, safe part of your care routine.
FAQ
Q: How should I prepare my cat and environment before using The Complete Guide to Stress-Free Cat Grooming at Home (2025)?
A: Start by setting a calm, quiet space with good lighting and a non-slip surface. Gather all supplies within reach so sessions are short; this aligns with cat grooming at home tips for a stress-free grooming experience. Handle your cat gently for a few minutes each day to build tolerance: soft petting, brief brushing, and rewards. Schedule grooming when your cat is relaxed (after a nap or play). Keep sessions under 10–15 minutes initially and end on a positive note.
Q: What tools and products are recommended for safe cat grooming at home?
A: Use a soft-bristle brush for short-haired cats and a rubber or slicker brush for long-haired coats; a wide-tooth comb helps prevent tangles. Have cat-specific nail clippers, ear-cleaning solution, a gentle cat shampoo, and styptic powder for accidental nicks. Use treats and a towel to swaddle if needed. Choose quiet, low-vibration tools when possible to reduce anxiety—these are core cat grooming at home tips found in the guide.
Q: How can I groom a cat at home without stress for your feline friend who becomes anxious?
A: Break the process into short, predictable steps: 1) acclimate the cat to each tool by offering treats and brief touches; 2) use counterconditioning—pair the tool with a high-value treat; 3) work on one area per session (e.g., brush for 1–2 minutes, reward, stop); 4) use pheromone sprays or diffusers and soft music to lower arousal. If an area provokes fear, pause and return later. Seek a veterinarian or professional groomer for behavioral strategies if anxiety persists.
Q: How often should I groom my cat at home and when is bathing necessary?
A: Frequency depends on coat type: short-haired cats usually need brushing once a week; medium to long-haired cats benefit from brushing 3–5 times weekly. Nail trims every 2–4 weeks, ear checks monthly. Bathing is rarely needed—only for skin conditions, heavy soiling, or when recommended by your vet. Regular grooming reduces shedding and hairballs and is a central recommendation in cat grooming at home tips for a stress-free grooming experience.
Q: What are safe, low-stress methods for dealing with mats, heavy shedding, and nail trimming at home?
A: For mats, work on small sections: hold the skin taut, gently tease mat edges with fingers, then use a mat splitter or wide-tooth comb; cut only as a last resort and never cut close to skin. For heavy shedding, increase brushing frequency and use a deshedding tool while being gentle. For nails, press the paw to extend the claw, trim just the tip avoiding the quick, and stop if the cat struggles—try brief sessions with rewards. If mats are severe or the cat fights, consult a professional to avoid injury.
")
")
")
")