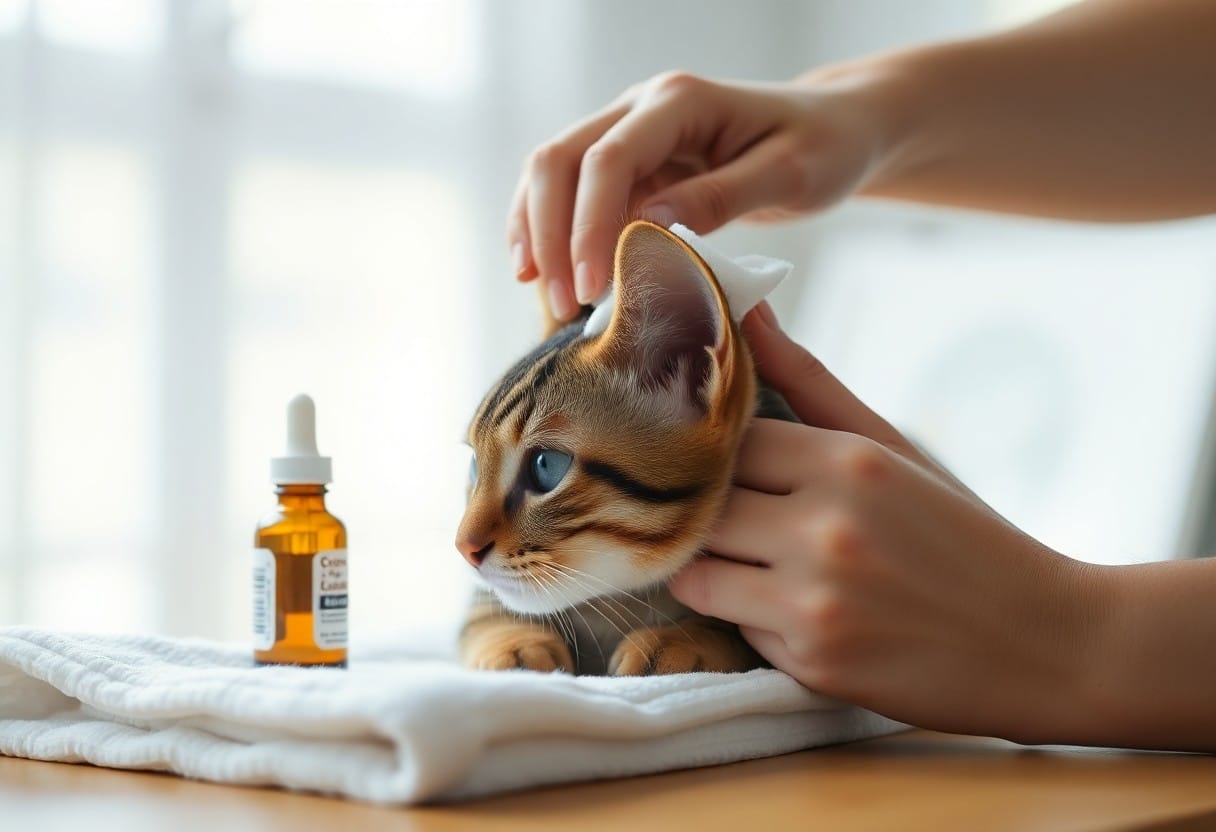
Over short, calm sessions you clean your cat’s ears with soft cotton and a gentle solution; use a vet-approved cleaner to reduce infection risk and avoid inserting anything deep to prevent pain or damage.

Factors Determining the Frequency of Ear Cleaning
You should tailor ear-cleaning to your cat’s age, medical history and lifestyle; these factors change how often you check ears. Thou must increase cleanings if you notice persistent discharge, bad odor or signs of ear infection.
- ear cleaning
- wax buildup
- ear infection
- breed factors
- environment
Identifying normal wax buildup versus infection
Inspect your cat’s ears for color, smell and pain: light brown wax without odor usually means normal buildup, while dark, smelly discharge and discomfort point to infection.
Environmental and breed-specific health factors
Outdoor cats and breeds with narrow ear canals or dense fur face more debris and moisture, increasing wax buildup and infection risk. Knowing how environment and anatomy affect your cat helps you set safe cleaning intervals.
- environment
- breed predisposition
- outdoor exposure
- ear anatomy
Breeds with floppy ears or thick hair trap moisture and debris, which raises the chance of otitis and recurring wax buildup. Knowing your cat’s specific risks lets you modify cleaning technique and frequency to prevent infection.
- floppy ears
- otitis
- wax buildup
- cleaning frequency
Essential Supplies for a Safe Procedure
Gather the basics: a vet-approved cleaner, soft cotton pads, a towel, and treats. Keep everything within reach so you can stay calm and efficient. Use a gentle, pH-balanced solution and avoid products meant for wounds or people.
Selecting vet-recommended cleaning solutions
Choose a vet-recommended ear cleaner formulated for cats; a pH-balanced, non‑irritating solution dissolves wax without stinging. Test a small amount on your cat’s skin if unsure.
Why cotton swabs and harsh chemicals must be avoided
Avoid cotton swabs and household chemicals: swabs can push debris deeper or perforate the eardrum, while alcohol or hydrogen peroxide can burn and irritate delicate ear tissue.
Cotton swabs often compact wax and risk puncturing the tympanic membrane; harsh cleaners strip protective oils and cause pain, itching, or secondary infections. You should apply cleaner to a pad, gently wipe the visible outer ear, and stop if you encounter blood, strong odor, or severe flinching-seek veterinary attention for those signs. Use gentle technique and vet-approved products every time.

Tips for Preparing Your Cat Mentally
Prepare your cat gradually with gentle handling, short sessions, and soft praise to reduce stress during ear cleaning. Perceiving calm signals like slow blinking, relaxed posture, and soft purring lets you proceed safely.
- ear cleaning
- stress reduction
- pheromones
- quiet location
Using pheromones and positive associations for relaxation
Apply a calming pheromone diffuser or spray nearby, then reward your cat with treats and gentle strokes so you create positive associations that ease handling and lower stress before you begin cleaning.
Choosing the optimal time and a quiet location
Select a calm moment after play or a meal when your cat is relaxed, and use a private, dim space free from other pets and loud noises so you minimize startle responses and make ear care smoother.
Observe your cat’s daily rhythms to schedule cleaning when they are naturally calm-often after activity or eating; set a soft towel on your lap, dim lights, and eliminate distractions. If you notice hissing, flattened ears, or attempts to bite, stop and try later. Short, frequent sessions reinforce calm behavior.
How-to: Step-by-Step Cleaning Technique
Follow the table below to perform calm, sequential ear cleaning: gather supplies, inspect the ear, apply cleaner, massage, wipe and reward your cat.
Step-by-Step Summary
| Step | Action |
|---|---|
| 1 | Gather cleaner, cotton balls, towel, treats |
| 2 | Inspect for redness, discharge, odor |
| 3 | Apply drops as directed, avoid touching nozzle |
| 4 | Massage ear base to move solution |
| 5 | Wipe loosened debris from outer ear |
| 6 | Reward cat and monitor for issues |
Gentle restraint and positioning methods
Position your cat on a non-slip surface, wrap a towel around the body to limit kicking, support the head gently, soothe with a soft voice and treats; never squeeze the neck.
Administering drops and massaging the ear base correctly
Apply drops as directed, keeping the nozzle clear of the ear to avoid contamination; gently massage the ear base for 20-30 seconds to spread solution, then let your cat shake and check for excess discharge or foul odor.
After massaging, use a cotton ball to remove loosened debris from the outer ear only; avoid cotton swabs or probes, which can push material deeper and risk eardrum injury. If you notice bleeding, intense pain, persistent foul smell, or worsening symptoms, stop and contact your veterinarian immediately.
Post-Cleaning Maintenance and Rewards
Aftercare means you check for redness, discharge, or bleeding, avoid inserting anything into the canal, and keep sessions short while you let fur dry naturally.
Drying the outer ear flap effectively
Gently pat the outer ear flap with a soft, absorbent cloth, blotting until mostly dry; you must never push material into the ear canal and should avoid cotton swabs.
Reinforcing the experience with high-value treats
Offer a high-value treat immediately after cleaning to create a positive association; give tiny pieces and praise calmly while you avoid overfeeding.
Select treats that are smelly, soft, and special-rotate options to keep enthusiasm high; give them while your cat is relaxed, keep the interaction brief to reinforce calm, and stop if your cat shows fear.
Knowing When to Seek Veterinary Assistance
You should contact your vet if cleaning causes intense pain, persistent bleeding, severe swelling, or sudden loss of balance; these signs suggest deep infection or ear damage that needs prompt professional care.
Recognizing symptoms of ear mites and deep infections
Observe frequent head shaking, intense scratching, dark crumbly discharge, or a foul odor; these signs often indicate ear mites or a deep infection, so you should seek veterinary diagnosis rather than guessing at home.
Understanding the risks of improper at-home cleaning
Avoid using cotton swabs or harsh cleaners; you can push debris deeper, perforate the eardrum, or worsen infections, increasing the chance of permanent hearing loss.
Improper cleaning can drive bacteria or mites deeper, cause eardrum rupture, chronic pain, or ongoing infections that require surgery; you may also mask symptoms with home remedies, delaying treatment and raising the risk of hearing loss or systemic illness, so have your vet recommend safe techniques or perform professional cleaning.
Conclusion
Drawing together, you should use a vet-approved cleaner, work slowly with short sessions, soothe your cat, avoid inserting objects into the ear canal, and stop if you see pain or discharge; regular checks and positive reinforcement keep cleaning effective and low-stress.
FAQ
Q: How often should I clean my cat’s ears and what is the safe step-by-step method?
A: Frequency depends on the cat. Cats with no history of ear problems usually need cleaning only during grooming sessions or if you see visible dirt; once a month is often sufficient for breeds with folded ears or waxy buildup. Gather supplies: a vet-approved ear cleaner, cotton balls or gauze pads, a towel, and treats. Hold your cat gently and wrap the body in a towel if it tends to squirm, leaving the head exposed. Apply a small amount of cleaner into the ear canal opening-do not insert the applicator deeply. Massage the base of the ear for 15-30 seconds to loosen debris and wax; the cat may shake its head. Allow shaking, then use a cotton ball or gauze to wipe away loosened material from the visible ear flap and entrance to the canal. Repeat on the other ear if needed. Avoid using cotton swabs inside the canal, avoid alcohol or hydrogen peroxide unless directed by your vet, and stop if the cat shows strong signs of pain.
Q: How can I clean my cat’s ears without causing stress or making the cat resistant to future cleanings?
A: Build positive associations with short, predictable sessions. Choose a quiet time when the cat is relaxed and pair handling with high-value treats or a favorite toy. Practice gentle petting around the head and base of the ears during normal play before attempting actual cleaning. Keep initial sessions under a minute and gradually increase duration as the cat tolerates handling. Use calm, low tones and slow movements. Enlist a second person to gently hold or soothe the cat if needed. Use a towel wrap for cats that scratch or bite, leaving the head accessible. Consider a feline pheromone diffuser or spray in the room to reduce anxiety. If a cat becomes highly agitated, stop, try again later, and break the process into smaller steps across multiple days rather than forcing a full cleaning.
Q: What signs indicate I should not clean the ears at home and when should I see a veterinarian?
A: Do not clean if the ear is hot, swollen, bleeding, or if the cat cries out at light touch to the ear; these signs suggest infection or injury. Seek veterinary care for persistent head shaking, a strong or foul odor, thick dark discharge, visible blood, crusting, ear mites confirmed by inspection, or balance problems such as head tilt and stumbling. A vet can perform an otoscopic exam, cytology, and prescribe appropriate topical or oral medications for infections or mite infestations. Home cleaning while an ear is painful can worsen injury and delay healing; follow your vet’s cleaning and treatment instructions between visits.
")

")